JavaScript」カテゴリーアーカイブ

JavaScript5.6(クラス継承)

5から続きます

3:thisを使いこなす

mixinとSCSSは1と同じなので省略

HTMLの記述

<!DOCTYPE html>
<html lang="en">
<head>
  <meta charset="UTF-8">
  <meta name="viewport" content="width=device-width, initial-scale=1.0">
  <meta http-equiv="X-UA-Compatible" content="ie=edge">
  <title>Document</title>
<link rel="stylesheet" href="style.css">
<link href="https://fonts.googleapis.com/css2?family=Teko:wght@500&display=swap" rel="stylesheet">
</head>
<body>
  <div id="container">
  <div class="animate-title">
    PLAY ANIMATION
  </div>
  <div class="animate-title-2">
    ANIMATIONNNNNN
  </div>
    <button id="btn">Animation</button>
  </div>
  <script src="main.js"></script>
</body>
</html>

main.jsの記述

document.addEventListener("DOMContentLoaded", function () {
  const btn = document.querySelector("#btn");
  const ta = new TextAnimation(".animate-title");
  const ta2 = new TextAnimation(".animate-title-2");
  ta.animate();
  ta2.animate();
// btn.addEventListener('click', ta.animate.bind(ta));
// bindを使いたくないとき
  btn.addEventListener("click", function () {
    ta.animate();
  });
});

// フリーな位置にあるとグローバルオブジェクト(window)を参照する
console.log(this);

// new演算子を使うことによってオブジェクトを生成するためのもの
class TextAnimation {
  constructor(el) {
// 変数taとta2参照する
  console.log(this);
  this.el = document.querySelector(el);
  this.chars = this.el.innerHTML.trim().split("");
  this.el.innerHTML = this._splitText();
}
_splitText() {
  return this.chars.reduce((acc, curr) => {
  curr = curr.replace(/\s+/, " ");
  return `${acc}<span class="char">${curr}</span>`;
}, "");
}

// animate() {
// console.log(this);
// this.el.classList.toggle("inview");
// }

// タイムアウトを設定するとき
// animate() {
// // windowは省略できるよ
// window.setTimeout(function (){
// // ここのthisはwindowsオブジェクトを参照する
// console.log(this);
// this.el.classList.toggle('inview');
// // bindを用いたthisの束縛
// }.bind(this));
// }
// }

// こちらの書き方でもOK(bindを使わないときの記法)
animate() {
  const _that = this;
    setTimeout(function () {
    console.log(_that);
   _that.el.classList.toggle('inview');
  },1000
 )};
}

続きを読む

JavaScript5.5(練習)

5.3から続く

①クラスとオブジェクトの使い方について

HTMLの部分

<!DOCTYPE html>
<html lang="en">
<head>
   <meta charset="UTF-8">
   <meta name="viewport" content="width=device-width, initial-scale=1.0">
   <meta http-equiv="X-UA-Compatible" content="ie=edge">
   <title>Document</title>
</head>
<body>
   <script src="main.js"></script>
</body>
</html>

Javascriptの部分

const obj = {
// プロパティとキーがあるものがオブジェクト
    first_name: 'Suzutuki',
    last_name: 'Akina',
    printFullname: function() {
       console.log('hello');
   }
}

// classという演算子を用いてオブジェクトを初期化する処理を記載する
class Myobj {
     constructor() {
       this.first_name = 'Suzutuki';
       this.last_name = 'Akina';
}

     printFullname() {
       console.log('hello');
  }
}
// new演算子を使うことによってインスタンスが生成される
const obj2 = new Myobj();

obj.printFullname()
obj2.printFullname()
console.log(obj.first_name);

検証して実行結果を確かめると・・・

続きを読む

Javascript5.4(クラス継承(Super))

5.3から続きます

2:クラス継承でコードを有効利用するには?

HTMLの記述

<!DOCTYPE html>
<html lang="en">
<head>
  <meta charset="UTF-8">
  <meta name="viewport" content="width=device-width, initial-scale=1.0">
  <meta http-equiv="X-UA-Compatible" content="ie=edge">
  <title>Document</title>
  <link rel="stylesheet" href="style.css">
  <link href="https://fonts.googleapis.com/css2?family=Teko:wght@500&display=swap" rel="stylesheet">
</head>
<body>
  <div id="container">
    <div class="tween-animate-title">
SUPER ANIMATION SUPER ANIMATION SUPER ANIMATION SUPER ANIMATION SUPER ANIMATION SUPER ANIMATION SUPER
ANIMATION SUPER ANIMATION SUPER ANIMATION SUPER ANIMATION SUPER ANIMATION SUPER ANIMATION SUPER ANIMATION
 </div>
</div>
  <script src="TweenMax.min.js"></script>
  <script src="main.js"></script>
</body>
</html>

TweenMax.min.jsを読みこませることで、簡単に複雑なアニメーションを使うことができる。

続きを読む

Javascript5.3(This)

5から続きます

1:thisを使いこなす

mixinとSCSSは1と同じなので省略

HTMLの記述

<!DOCTYPE html>
<html lang="en">
<head>
  <meta charset="UTF-8">
  <meta name="viewport" content="width=device-width, initial-scale=1.0">
  <meta http-equiv="X-UA-Compatible" content="ie=edge">
  <title>Document</title>
<link rel="stylesheet" href="style.css">
<link href="https://fonts.googleapis.com/css2?family=Teko:wght@500&display=swap" rel="stylesheet">
</head>
<body>
  <div id="container">
  <div class="animate-title">
    PLAY ANIMATION
  </div>
  <div class="animate-title-2">
    ANIMATIONNNNNNNNN
  </div>
    <button id="btn">Animation</button>
  </div>
  <script src="main.js"></script>
</body>
</html>

main.jsの記述

続きを読む

JavaScript5(DOM操作、class)

テキストアニメーションから続く

1:DOM操作(アニメーションのための文字分割)

HTMLの記述

<!DOCTYPE html>
<html lang="en">
<head>
  <meta charset="UTF-8">
  <meta name="viewport" content="width=device-width, initial-scale=1.0">
  <meta http-equiv="X-UA-Compatible" content="ie=edge">
  <title>Document</title>
  <link rel="stylesheet" href="style.css">
  <link href="https://fonts.googleapis.com/css2?family=Teko:wght@500&display=swap" rel="stylesheet">
</head>
<body>
  <div id="container">
   <div class="animate-title inview">
    SUPER ANIMATION
   </div>
    <button onclick="document.querySelector('.animate-title').classList.toggle('inview');">Animation</button>
  </div>
<script src="main.js"></script>
</body>
</html>

mixinの記述

@mixin animation(
  $name,
  $duration: 1s,
  $timing-function: ease,
  $delay: 0s,
  $iteration-count: 1,
  $direction: normal,
  $fill-mode: forwards
) {
animation: {
  name: $name;
  duration: $duration;
  timing-function: $timing-function;
  delay: $delay;
  iteration-count: $iteration-count;
  direction: $direction;
  fill-mode: $fill-mode;
 }
}

SCSSの記述(テキストアニメーションのときに使ったのとほぼ同じ)

続きを読む

Text Animationを作る1(テキストアニメーション)

その4から続く

ボタンを押したら発火するシンプルなアニメーションを作ってみよう!

HTMLの記述

<!DOCTYPE html>
<html lang="en">
<head>
<meta charset="UTF-8">
<meta http-equiv="X-UA-Compatible"content="IE=edge">
<meta name="viewport"content="width=device-width, initial-scale=1.0">
<title>Document</title>
<link rel="stylesheet"href="style.css">
</head>
<body>
  <div id="container">
  <div class="animate-title">
    <spanclass="char">A</span>
    <spanclass="char">N</span>
    <spanclass="char">I</span>
    <spanclass="char">M</span>
    <spanclass="char">A</span>
    <spanclass="char">T</span>
    <spanclass="char">I</span>
    <spanclass="char">O</span>
    <spanclass="char">N</span>
  </div>
  <button onclick="document.querySelector('.animate-title').classList.toggle('inview');">Animation</button>
</button>
  </div>
  </body>
</html>

mixinの記述

@mixin animation(
  $name,
  $duration: 1s,
  $timing-function: ease,
  $delay: 0s,
  $iteration-count: 1,
  $direction: normal,
  $fill-mode: forwards
) {
animation: {
  name: $name;
  duration: $duration;
  timing-function: $timing-function;
  delay: $delay;
  iteration-count: $iteration-count;
  direction: $direction;
  fill-mode: $fill-mode;
 }
}

SCSSの記述

続きを読む

JavaScript学習のまとめ4(DOM基礎)

3から続きます

1:DOM(Document Object Model)とは?

1:HTMLをJavaScriptから操作できるようにしたインターフェイス

2:JavaScriptからはDOM APIを通じてHTMLの情報を取得・変更します。

document.querySelectorを使う場合が多いらしい

3:情報の取得・変更・イベントの登録などができます。

例1

const ul = document.querySelector('ul')
undefined ul.style.color = 'red' "red"
const firstLi = ul.querySelector('li')
undefined firstLi.style.color = 'black' "black"

続きを読む

JavaScript学習のまとめ3(forEach、reduce関数)

2.5から続きます

1:配列とforEachメソッド

HTMLの記述は1と同じなので省略

main.jsの記述

const arry = [1, 2, 3, 4, 5];

// 変数名は何でもいいのでv,forEachを使ったほうが記述が少ない
  arry.forEach(function(v, i, ary) {
    console.log(v, i, ary);
})

// アロー関数の記法だと更に省略できる
  arry.forEach(v => console.log(v));

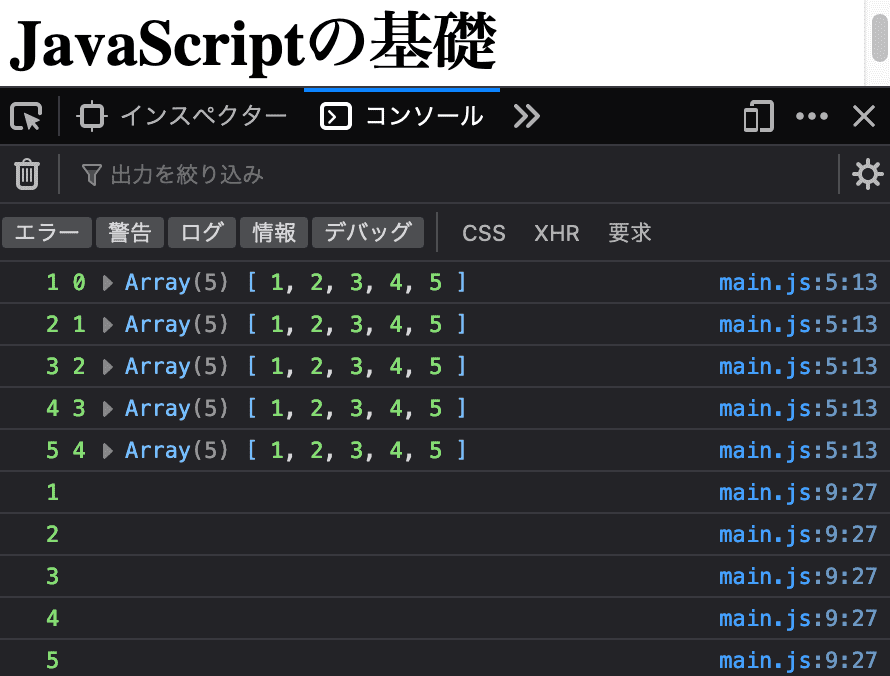
検証して実行結果を確かめると・・・

続きを読む

JavaScript学習のまとめ2.5(コールバック関数とループ処理)

2から続きます。

コールバック関数とは?

引数に渡す関数をcallback関数という。

HTMLの記述

<!DOCTYPE html>
<html lang="en">
<head>
  <meta charset="UTF-8">
  <meta name="viewport" content="width=device-width, initial-scale=1.0">
  <meta http-equiv="X-UA-Compatible" content="ie=edge">
<title>Document</title>
</head>
<body>
  <h1>JavaScriptの基礎</h1>
   <script src="main.js"></script>
</body>
</html>

main.jsの記述

// いつもの基本的な書き方
// function hello(name) {
// console.log("hello " + name);
// }
// hello("Tanaka Tarou");

// callbackに関数getnameが渡る(戻り値'Tanaka Tarou')
function hello(callback, lastname) {
// 関数を実行するためcallback()としている
 console.log('hello ' + callback());
 }
// 引数に渡す関数をcallback関数という
 function getFirstName() {
 return 'Tanaka';
}
 function getName() {
 return 'Tanaka Tarou';
}

// 関数を渡すと戻り値'Tanaka Tarou'が渡る
 hello(getFirstName);
 hello(getName); 
// コールバックに引数を渡したい場合、lastnameにAkinaが渡ってくる
function hello2(callback, lastname) {
// 関数を実行するためcallback()としている
// callback(第一引数)の中身がこれ
console.log(callback)
console.log(lastname)
console.log(callback(lastname))
console.log(callback(callback))
console.log('hello ' + callback(lastname));
}
// 無名関数
hello2(function(name) {
return 'suzutuki ' + name;
}, 'Akina');

// アロー関数の記法に直すと(functionと{}とreturnを省略)
// hello(() => 'suzutuki');

function doSomething(a, b, callback) {
// 結果をコールバック関数に渡す
const result = callback(a, b);
console.log(result);
}

function plus(a, b) {
return a + b;
}
function multiply(a, b) {
return a * b;
}
// 処理結果を変えることができる
doSomething(2, 3, plus);
doSomething(2, 4, multiply);

続きを読む

JavaScript学習のまとめ2(比較演算子、アロー関数、コールバック関数、)

1:比較演算子についてのまとめ

HTMLの記述

<!DOCTYPE html>
<html lang="en">
<head>
  <meta charset="UTF-8">
  <meta name="viewport" content="width=device-width, initial-scale=1.0">
  <meta http-equiv="X-UA-Compatible" content="ie=edge">
<title>Document</title>
</head>
<body>
  <h1>JavaScriptの基礎</h1>
   <script src="main.js"></script>
</body>
</html>

main.jsの記述

if(false) {
  console.log('this is true');
} else if(true) {
  console.log('this is else if block');
} else {
  console.log('this is false');
}

// データの型も一致してないとダメこの場合false,==だとtrue
if(1 === '1') {
  console.log('this is true');
} else {
  console.log('this is false');
}

// この場合trueになる,falseは0,型の変換をする
if(1 == true) {
  console.log('this is true');
} else {
  console.log('this is false');
}

// =でないことを確認したいとき、型の比較もするので
if(0 !== '0') {
  console.log('this is true');
} else {
  console.log('this is false');
}

// 数字に変換してから値の比較を行って反転
if(0 != '0' ) {
  console.log('this is true');
} else {
  console.log('this is false');
}

// 両方の条件を満たしていないのでfalse
if(0 == '0' && 0 === '0') {
  console.log('this is true');
} else {
  console.log('this is false');
}

// どちらかがtrueならtrueに行く
if(0 === '0' || 0 == '0') {
  console.log('this is true');
} else {
  console.log('this is false');
}

const num = null;
const bool = Boolean(num);
console.log(bool);

if(!num) {
  console.log('this is true');
} else {
  console.log('this is false');
}

検証して実行結果を確かめると・・・

まとめ

===はデータの型も一致してないとダメ、==はOK

!==は型の比較をするので注意、!=は文字列を数字に変換してから比較して反転する

&&はandと同じで両方trueでないときはfalse

||はorと同じで両方falseでないときはtrue

falseは0,trueは1

最後のnullはfalseと同じ(厳密には違う)なので反転してtrue

2: アロー関数

アロー関数を使うと省略した記法でコードを記述できる。

HTMLの記述は1と同じなので省略

main.jsの記述

// hello();より下に移動してもエラーにならない
// function hello(name = 'Yan') {
// console.log('hello ' + name);
// }

// hello();より下に移動するとエラー
// const hello = function(name = 'Yan') {
// console.log('hello ' + name);
// }

// // アロー関数にすると1行だけなら{}を除ける
// const hello = (name = 'Yan') => console.log('hello ' + name);

// // 引数がデフォルト値ならこうで
// const hello = name => console.log('hello ' + name);

// // 引数が2つならこのように記述
// const hello = (name, age) => console.log('hello ' + name + age);

// 戻り値を出力する場合、一般的記法
// const hello = (name, age) => {
// return 40;
// }

// 上と同じ意味だが更に省略できる
// const hello = (name, age) => 40;
// console.log(hello());

// 省略前の記法
// const retriever = (name, age) => 40;
// const arry = [1,2,3,4,5,6];
// arry.forEach(value => {
// console.log(value);
// })

// 省略後のアロー関数の記法
  const retriever = (name, age) => 40;
// 戻り値40が出力される
  console.log(retriever());
  const arry = [1,2,3,4,5,6];
  arry.forEach(value => console.log(value));
  const hello = (name, age) => console.log('hello ' + name + age);
  hello('Tarou Tanaka ', 15);
  hello('Tarou Tanaka2 ', 25);

検証して実行結果を確かめると・・・

↑がなぜ出力されたか?

  1. const retriever = (name, age) => 40;  console.log(retriever());で=> 40の部分が戻り値なので出力された
  2. 配列をループして出力したから
  3. ‘hello ‘ + 与えた引数で出力された
  4. ‘hello ‘ + 与えた引数で出力された

3:コールバック関数について

HTMLの記述は1と同じなので省略

main.jsの記述

// いつもの基本的な書き方
// function hello(name) {
// console.log("hello " + name);
// }
// hello("Tanaka Tarou");

// callbackに関数getnameが渡る(戻り値'Tanaka Tarou')
function hello(callback, lastname) {
// 関数を実行するためcallback()としている
 console.log('hello ' + callback());
 }
// 引数に渡す関数をcallback関数という
 function getFirstName() {
 return 'Tanaka';
}
 function getName() {
 return 'Tanaka Tarou';
}

 hello(getFirstName);
// 関数を渡すと戻り値'Tanaka Tarou'が渡る
 hello(getName);

// コールバックに引数を渡したい場合、lastnameにAkinaが渡ってくる
function hello2(callback, lastname) {
// 関数を実行するためcallback()としている
// callback(第一引数)の中身がこれ
console.log(callback)
console.log(lastname)
console.log(callback(lastname))
console.log(callback(callback))
console.log('hello ' + callback(lastname));
}
// 無名関数
hello2(function(name) {
return 'suzutuki ' + name;
}, 'Akina');

// アロー関数の記法に直すと(functionと{}とreturnを省略)
// hello(() => 'suzutuki');

function doSomething(a, b, callback) {
// 結果をコールバック関数に渡す
const result = callback(a, b);
console.log(result);
}

function plus(a, b) {
return a + b;
}
function multiply(a, b) {
return a * b;
}
// 処理結果を変えることができる
doSomething(2, 3, plus);
doSomething(2, 4, multiply);

検証して実行結果を確かめると・・・
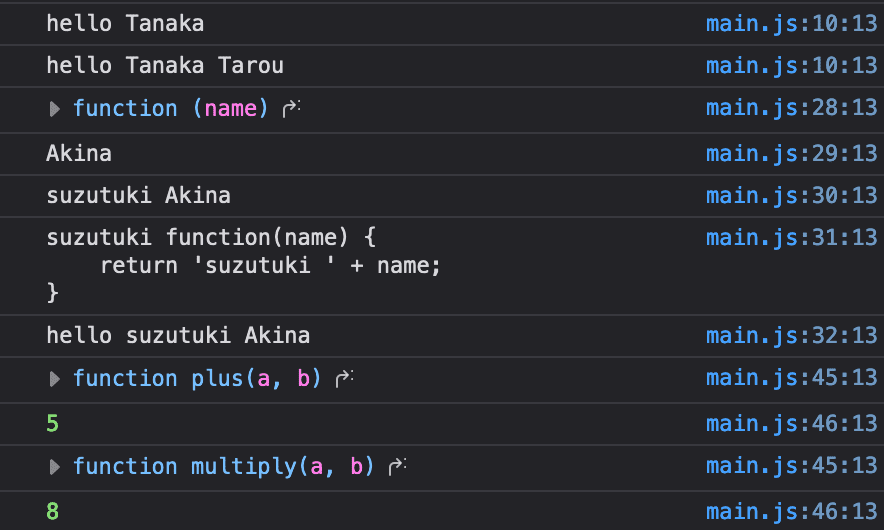
↑がなぜ出力されたか?

  1. 関数getFirstNameの戻り値’Tanaka’がcallbackに渡されるのでhello Tanakaになった
  2. 関数getNameの戻り値’Tanaka Tarou’がcallbackに渡されるのでhello Tanaka Tarouになった
  3. 無名関数function(name) { return ‘suzutuki ‘ + name; }の部分が第一引数の中に入っているためこのように出力された
  4. 無名関数’Akina’の部分が第二引数なのでAkinaが出力された
  5. 無名関数function(name) { return ‘suzutuki ‘ + name; }の部分のnameの部分は第二引数のAkinaが格納されているのでSuzutuki Akinaと出力された。
  6. 無名関数function(name) { return ‘suzutuki ‘ + name; }の部分のnameの部分は第一引数の関数の無名関数function(name) { return ‘suzutuki ‘ + name; }が格納されているのでSuzutuki +無名関数function(name) { return ‘suzutuki ‘ + name; }と出力された。
  7. 5に単純に’hello’が追加されただけなので出力された。
  8. console.log(callback);のcallbackの中身はcallback関数なのでfunction plus(a, b) { return a + b; } が出力された。
  9. 変数resultには第三引数のcallback関数 function plus(a, b) { return a + b; }が入っていて、式展開が行われた結果5が出力された。
  10. console.log(callback);のcallbackの中身はcallback関数なので
    function multiply(a, b) { return a + b; } が出力された。
  11. 変数resultには第三引数のcallback関数 function multiply(a, b) { return a * b; }が入っていて、式展開が行われた結果8が出力された。

※ポイント

console.log()で中身を確認すると理解しやすいので、積極的に使おう!