①クラスとオブジェクトの使い方について
HTMLの部分
<!DOCTYPE html>
<html lang="en">
<head>
   <meta charset="UTF-8">
   <meta name="viewport" content="width=device-width, initial-scale=1.0">
   <meta http-equiv="X-UA-Compatible" content="ie=edge">
   <title>Document</title>
</head>
<body>
   <script src="main.js"></script>
</body>
</html>
Javascriptの部分
const obj = {
// プロパティとキーがあるものがオブジェクト
    first_name: 'Suzutuki',
    last_name: 'Akina',
    printFullname: function() {
       console.log('hello');
   }
}

// classという演算子を用いてオブジェクトを初期化する処理を記載する
class Myobj {
     constructor() {
       this.first_name = 'Suzutuki';
       this.last_name = 'Akina';
}

     printFullname() {
       console.log('hello');
  }
}
// new演算子を使うことによってインスタンスが生成される
const obj2 = new Myobj();

obj.printFullname()
obj2.printFullname()
console.log(obj.first_name);
検証して実行結果を確かめると・・・

クラスとオブジェクトの使い方のおさらいができた。
②thisとbindについて
HTMLの記述
<!DOCTYPE html>
<html lang="en">
<head>
   <meta charset="UTF-8">
   <meta name="viewport" content="width=device-width, initial-scale=1.0">
   <meta http-equiv="X-UA-Compatible" content="ie=edge">
   <title>Document</title>
</head>
<body>
     <script src="main.js"></script>
</body>
</html>
Javascriptの記述
const obj = {
  first_name: "Jirou",
  last_name: "Yamada",
  printFullName: function () {
  // このThisはobjを参照するのでfirst_name: 'Jirou',last_name: 'Yamada',が出力されるよ
    console.log(this);
  // thisを固定する方法1: 変数としてこの時点のthisを入れる
    const _that = this;
    window.setTimeout(function () {
// このthisはwindowを参照する
     console.log(this);
// こちらのやり方だとobjが出力されるよ
     console.log(_that);
  });
 },
};
console.log(obj.first_name);
obj.printFullName();
const obj2 = {
  first_name: "Akina",
  last_name: "Suzutuki",
  printFullName: function () {
    setTimeout(
      function () {
   // このthisはwiondowを参照する(bindがない場合)
        console.log(this);
   // thisを固定する方法2:.bindを使う
   // }.bind(this));
   // thisのbindの引数で与えたオブジェクトに変えることもできるよ
   }.bind({ first_name: "Akina" })
  );
 },
};
console.log(obj2.first_name);
obj2.printFullName();
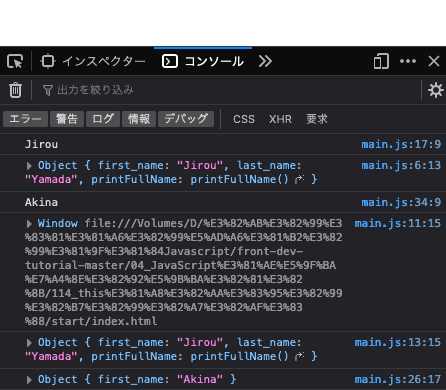
検証して実行結果を確かめると・・・

console.logを使って処理の流れを見れば理解しやすい。
